Why Your New Dryer Won’t Fit or Work (and How We Fix It)
New dryer won’t fit or run right? We explain how we fix tight laundry layouts, bad outlets, and older wiring so your dryer works safely and fits like it should.
When Your “New” Dryer Won’t Fit (Or Work)
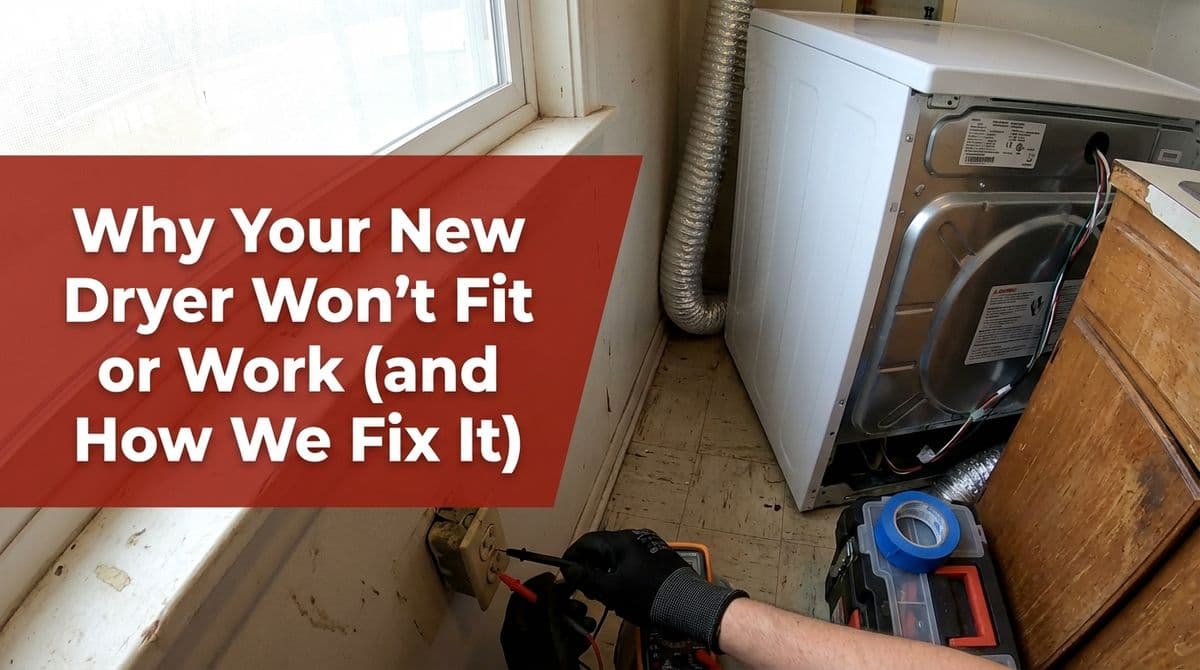
We recently got a call from a homeowner — let’s call him Ryan — who was beyond frustrated with his new dryer. He told us, “The dryer doesn’t fit where it’s supposed to go because there’s a beam in the way. We finally muscled it in, but now the outlet isn’t wired right, so it won’t work either.”
We hear some version of Ryan’s story a lot. A laundry room looks fine until you try to slide in that new, deeper dryer or stack a washer and dryer, and suddenly something’s in the way: a post, a side wall, a tight doorway, or a misplaced outlet. Then, even if you manage to squeeze it in, the electrical (or gas) setup isn’t right.
In Ryan’s case, we scheduled a visit to look at both the framing and the outlet. When we arrived, we could see right away that this wasn’t just a “shove-it-a-little-harder” situation. We had to treat it like what it really was: a layout and safety problem. Here’s how we approach jobs like this and what you can watch for in your own laundry room.
Dryer Too Big for the Space? How We Tackle Layout Problems
Modern dryers are often deeper than the older models they replace. When we walk into a tight laundry room, we start with measurements and clearances before we ever touch a tool.
Here’s what we typically check:
- Actual appliance size – Manufacturer specs for width, height, and especially depth.
- Wall-to-door opening – The real usable depth once you subtract trim and thresholds.
- Vent and hose space – We usually plan 4–6 inches behind the dryer for venting and hoses.
- Side clearance – You generally want at least 1 inch on each side so the dryer can breathe and not rub.
With Ryan, the “beam” on the side of the opening was the main blockage. We had to figure out whether we could modify that area or if it was structurally critical.
When a Post, Beam, or Wall Is in the Way
Any time we’re asked, “Can you just cut that out so the dryer fits?” we slow things down. Some pieces of lumber are finish-only, but others are actually holding up part of your home.
Our process usually looks like this:
- Identify what that piece really is – Stud, post, trim, or load-bearing beam.
- Check what’s inside – We look for hidden electrical, plumbing, or ductwork in the wall or post.
- Decide on a safe modification – Sometimes we can shave a bit of non-structural material. Other times we redesign the opening.
When a structural member is involved, we don’t “just cut it.” We design a supported opening with proper framing so the load is carried safely somewhere else. That might mean installing a header, adding jack studs, or slightly shifting the opening so the dryer can slide in without compromising your home’s structure.
In non-structural cases, we may trim back drywall, move a bit of framing, or rebuild a shallow partition wall to pick up a precious inch or two. Done carefully, that’s often enough to make a new dryer fit smoothly.
Common Electrical Problems That Stop a New Dryer Cold
In Ryan’s laundry room, once we confirmed what we could do with the opening, we turned to the outlet. The previous work on the circuit wasn’t done correctly, and that’s where things can get dangerous fast.
When we check a dryer circuit, here’s the basic process we follow:
- Confirm the circuit type – Newer electric dryers typically need a 240V, 30-amp circuit with the right gauge wire.
- Match plug and receptacle – We verify whether you have a 3-prong or 4-prong setup and whether it matches the dryer cord.
- Inspect connections – We look for reversed hot/neutral, missing ground, loose lugs, and signs of overheating.
- Test with a meter – We confirm correct voltage between all legs, not just “does it turn on.”
In older homes, the dryer outlet may have been “updated” a few times by different people. We sometimes find wire nuts hanging loose in the box, mis-sized breakers, or DIY splices that are a real fire risk. Our job is to bring it back to a clean, code-compliant circuit that your dryer — and your house — can rely on.
Gas vs. Electric Dryers: What We Watch For
While Ryan’s dryer was electric, we see similar layout headaches with gas dryers too. We always take a slightly different approach depending on what you have:
- Electric dryers – Need a correct 240V circuit, a properly sized breaker, and good ventilation. We focus on wire size, breaker size, and outlet type.
- Gas dryers – Need a safe gas line with a shutoff valve in the same room, proper venting, and a standard 120V outlet. We look at gas line routing, material, support, and leak protection.
With gas dryers, we’re extra careful about clearances around the gas line and shutoff valve when we adjust framing or squeeze appliances into tight spaces. A dryer that “just barely fits” isn’t worth it if you can’t safely access the gas shutoff or if the line is being stressed.
Older Laundry Rooms vs. Newer Code Requirements
Another thing we see, especially in older houses, is that the laundry area simply wasn’t built with today’s appliances or codes in mind. When we walk into a 30–50 year old laundry room, we’re on the lookout for:
- Outdated dryer circuits – 3-wire setups where a 4-wire is now recommended for better grounding.
- Overloaded circuits – Washers, dryers, and extra outlets all tied into one breaker.
- Improper venting – Long, sagging foil vents or vents that dump into an attic or crawlspace.
- Too-tight clearances – Doorways, framing, or cabinets that made sense for smaller, older machines.
When we upgrade these spaces, we often separate circuits so each big appliance has what it needs, bring outlets and breakers up to current standards, and tweak the layout so you can actually service or replace your machines in the future.
When It’s Time to Call a Pro (Like Us)
There’s nothing wrong with sliding a dryer into place yourself, but there are certain signs that it’s time to bring in help. We always tell homeowners to call us if:
- You’re thinking about cutting or removing any beam, post, or wall section.
- The dryer cord doesn’t match the outlet, or you aren’t sure if it’s 3-prong vs. 4-prong.
- The breaker trips, the outlet buzzes, or you see any scorching around the receptacle.
- The dryer only fits if you crush the vent hose or bend a gas line out of the way.
- You can’t meet the recommended clearances from the dryer manual without altering the space.
In Ryan’s case, we were able to adjust the opening safely, correct the wiring on the dryer circuit, and set everything up so the new dryer slid in, vented properly, and ran the way it was designed to. No forcing, no guessing, and no overheating wires behind the wall.
If your new dryer won’t fit or won’t work, it’s usually not the appliance’s fault — it’s the layout or the electrical (or both). Our job is to make the space match the machine safely, so you can close the laundry room door, hit “Start,” and not think about it again.